
This is my original tutorial, republished on this website. The examples are preserved. Tool versions and interfaces may have changed.Microsoft developed TypeScript as a superset of JavaScript that has a single open-source compiler. It is a strict syntactical language that provides optional static typing, classes and interfaces. In addition to many other languages, MongoDB also supports TypeScript through TypeScript drivers. Learn more about TypeScript integration with MongoDB now. This tutorial assumes that you have some familiarity with Node.js and MongoDB Atlas.
Why TypeScript?
Prerequisites
npm install --global yarn
Setting Up Your Project
#Making the folder
mkdir typeScriptProject

#entering the folder
cd typeScriptProject

#creating the required folder
mkdir src
#Initialising with package(dot)json file
npm init -y

#If you prefer to use yarn
#yarn init -y
# dependencies
npm install express mongodb cors dotenv
- mongodb command installs MongoDB database driver that allows your Node.js applications to connect to the database and work with data.
- express installs the web framework for Node.js (it will make our life easier),
- cors installs a node. js package that allows cross origin resource sharing.
- dotenv installs the module that loads environment variables from a .env file into the process.env file. This lets you separate configuration files from the code.
# devDependencies
npm install -D nodemon TypeScript ts-node @types/express @types/mongodb @types/node
- nodemon command restarts the Node application whenever changes in the files in the directory are detected.
- TypeScript command adds optional types to JavaScript that support tools for large-scale JavaScript applications for any browser, for any host, on any OS.
- ts-node command transforms TypeScript into JavaScript, enabling you to directly execute TypeScript on Node.js without precompiling.
- @types refers to the package containing the definition for the specific types.
Configurations
{
  "compilerOptions": {
    /* Basic Options */
    "target": "es6",
    "watch": true,
    "module": "commonjs",
    "outDir": "./dist",
    /* Strict Type-Checking Options */
    "strict": true,
    "esModuleInterop": true,
    /* Source Map Options */
    "sourceRoot": "./src",
    "inlineSourceMap": true
  },
  "include": ["src/**/*.ts"],
  "exclude": ["node_modules", ".vscode"]
}
- target field specifies the JavaScript version of the destination code. By setting it to ES6, we ensure the destination code will be in JavaScript version ES6.
- watch field, when set to true, recompiles the code every time we save it.
- sourceRoot field specifies the folder where we will store all the TypeScript files.
- outDir field indicates the folder where all the JavaScript files will be exported.
- include field specifies the folders we want to include during compilation.
- exclude field specifies the folders we do not want to include during compilation.
  "scripts": {
    "start": "node dist/index.js",
    "dev": "nodemon src/index.ts",
    "build": "tsc -p ."
  },
Sample ToDo Program
import express, { Request, Response } from 'express';

const app = express();

app.get('/', (req:Request, res:Response) =>{
    res.send("Hello");
});

app.listen(5000, ()=>console.log(`Server is running on port 5000`));
Connecting to the Database
MongoDB Atlas provides a free tier cluster that never expires and lets you access a subset of Atlas features and functionality. To create a new database cluster:
- Sign in to your MongoDB Atlas account then, click on Build a cluster.
- Choose the region closest to you and click on Create Cluster.
- Go to Network access on the left-hand side and add your IP address to the Whitelist.
- On the Database access, just above network access, add a database user. For this tutorial, we will add a user mern with the password mongodb.
- Go to Clusters and click on Connect.
- Choose Connect your application as your connection method.
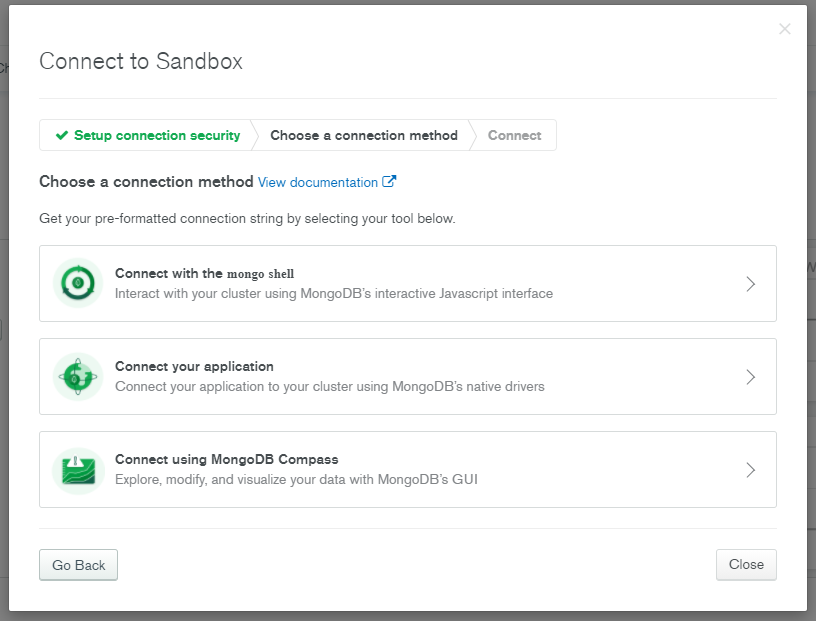
- Copy the connection string. We will use it in our application to connect to MongoDB.
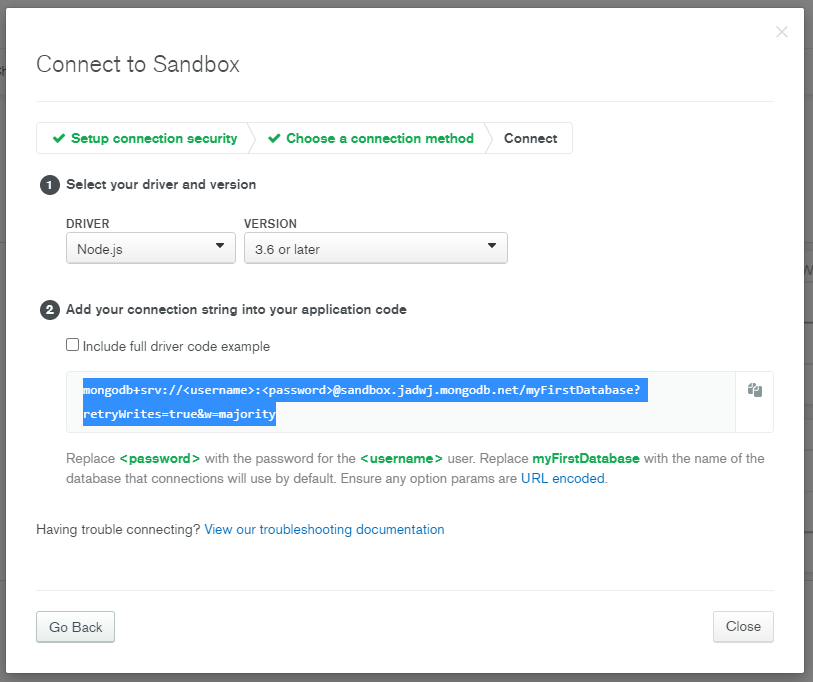 Now if you have the connection string, let’s go back to the root directory (directory that contains src folder) and create a .env file.
Paste the connection string to the ATLAS_URI variable. Once done, your file should look similar to the one below.
ATLAS_URI=mongodb+srv://<username>:<password>@sandbox.jadwj.mongodb.net/myFirstDatabase?retryWrites=true&w=majority
PORT=5000
import express, { Request, Response } from 'express';
import dotenv from "dotenv";
const MongoClient = require('mongodb').MongoClient
const app = express();
dotenv.config();

const uri = process.env.ATLAS_URI

MongoClient.connect(uri,{ useNewUrlParser: true, useUnifiedTopology: true }, (err:any, client:any) => {
    if (err) return console.error(err)
    console.log('Connected to Database')
  })

app.get('/', (req:Request, res:Response) =>{
    res.send("Hello");
});

app.listen(5000, ()=>console.log(`Server is running on port 5000`));
Creating Models
import express, { Request, Response, Router } from 'express';
const documentRoutes = express.Router();
const mongodb = require('mongodb');
const uri = process.env.ATLAS_URI

// Using this we will connect to the database
async function dataWithDatabase() {
  const client = await mongodb.MongoClient.connect(
    uri,
    {
      useNewUrlParser: true,
      useUnifiedTopology: true
    }
  );
// Here, test is the database and mongo is the collection
  return client.db('test').collection('mongo');
}


// This section will help you get a list of all the documents.
documentRoutes.route("/document").get( async (req:Request, res:Response) => {
  const documents = await dataWithDatabase();
  res.send(await documents.find({}).toArray());
});

// This section will help you create a new document.
documentRoutes.route("/document/add").post(async (req:Request, res:Response) => {
  const documents = await dataWithDatabase();
  await documents.insertOne({
    text: req.body.text,
    createdAt: new Date()
  });
  res.status(201).send();
  console.log("Record added")
});

// This section will help you update a document by id.
documentRoutes.route("/update/:id").post(async (req:Request, res:Response) => {
  const documents = await dataWithDatabase();
  let document ={text: req.body.text, createdAt: new Date()}
  await documents.updateOne({id: req.body.id}, {$set:document}, {upsert:true} );
  res.status(200).send({});

});

// This section will help you delete a document
documentRoutes.route("/:id").delete(async(req:Request, res:Response) => {
  const documents = await dataWithDatabase();
  await documents.deleteOne({ _id: new mongodb.ObjectID(req.params.id) });
  res.status(200).send({});
});

module.exports = documentRoutes;
- /document - to show all the documents
- /document/add - to add documents
- /update/:id - to update document with specific id
- /:id - to delete document with specific id
import express from 'express';
import dotenv from "dotenv";

const app = express();
dotenv.config();
app.use(express.json())

var mainRoutes = require('./routes/documentRoutes')
app.use(mainRoutes);

app.listen(5000, ()=>console.log(`Server is running on port 5000`));
Testing our Models and Adding Data
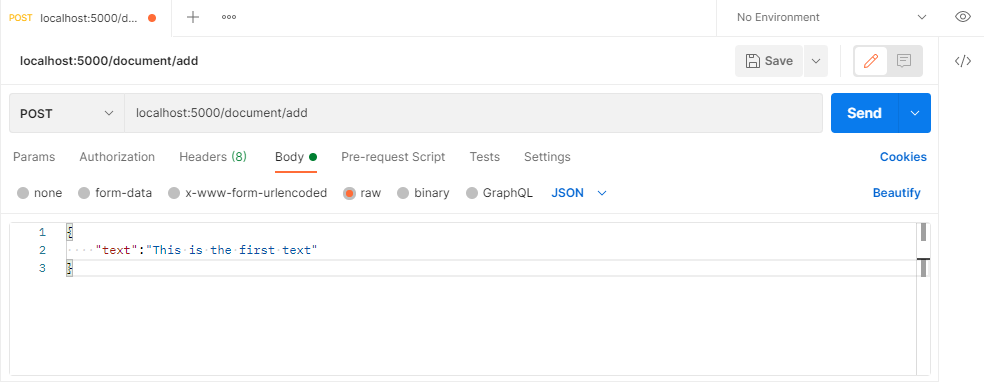 If successful, you will get the “document added” message on your console.
To check if the document was inserted, go to your MongoDB Atlas database. You can find the inserted document under the specified Collections of your database.
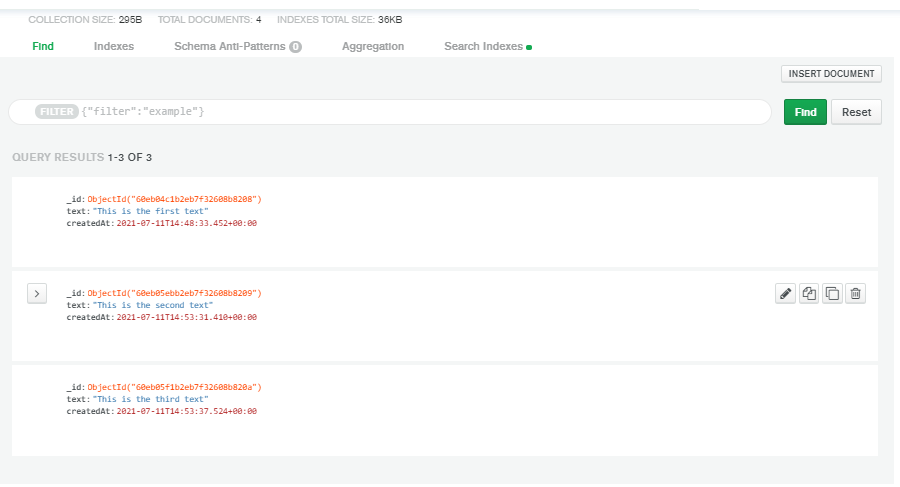 Continue testing the update and delete route using Postman and JSON data following the steps specified above.
An update URL would look like the following.
http://localhost:5000/update/<id>
While a delete URL would look like the following.
http://localhost:5000/<id>
For each of these routes, you will need the <id> of the documents.
To view all the documents, use the following URL.
http://localhost:5000/document