This is my original tutorial, republished on this website. The examples are preserved. Tool versions and interfaces may have changed.
Learn about how to implement Auto Increment in MongoDB Atlas.
Introduction
When you set a field in a database to auto-increment, its value increases in a sequential order every time you insert a new record, automatically. While the auto-increment feature is available in many relational databases, implementing an auto-incrementing field in a NoSQL database may not be straightforward. Yet, you can still auto-increment a field in a NoSQL database by following some simple steps. In this tutorial, we will learn the steps to auto-increment a field in MongoDB Atlas.
Prerequisites
This tutorial assumes that you have installed and configured MongoDB. If you have not done so, follow the steps below:
Ready a cluster or create one. You can create one MongoDB Atlas cluster for free. Learn more about MongoDB Atlas here.
Create a database user and add your IP to get network access to the cluster.
Download the mongo shell and then add <your mongo shell's download directory>/bin to your $PATH variable.
Use the cluster’s connection string on your command line to connect to the cluster and access it via the mongo shell.
Note: All the commands in this tutorial are run on the mongo shell.
Considerations
To ensure your database remains scalable with a large number of documents, we recommend avoiding the use of an auto-increment pattern for the _id field or any field in MongoDB. In case of a concurrency failure, it can result in data duplication.The default value ObjectId is ideal for the auto-generated _id rather than an auto-incremented value. Learn about Object Id for more information.
How does Auto-increment Work in MongoDB?
Although MongoDB does not support auto-increment sequence as a default feature like some relational databases, we can still achieve this functionality using a counter collection. The counter collection will have a single document that tracks the current unique identifier value. Learn how to create a counter collection and implement auto-increment below.
Step-by-step guide for Auto-incrementing a Field in MongoDB Atlas using a JavaScript function
To implement an auto-incrementing field, you need at least two collections. You can go toThe first collection will hold the details of the students; hence we will name it students. Run the following command to create a students collection.
db.createCollection("students");
The next collection will hold the current unique identifier value for the students. Let’s name it counters. Run the following command to create a counters collection.
db.createCollection("counters");
Insert a seed value into the counters collection by running the following code.
db.counters.insert({ seq_value:0 });
Now, we will implement our auto-increment using Triggers in MongoDB Atlas. Triggers allow you to execute server-side logic in response to database events or according to a scheduleTo implement triggers for auto-increment, first, log into your MongoDB Atlas account. On the left-hand side, below the Clusters options, there is an option called Triggers. Click on Triggers. Then click on Add Trigger. Set the following for your triggers:
Trigger Type - Database
Name - as your preference
Enabled - ON
Event Overriding - ON
Cluster Name - the cluster with your database.
Database Name - the database with your students and counters collection.
Your code should look like this.In the code, we have first initialized counters collection and looked for event changes in the students collection. When data is inserted into students, the trigger runs the code. Here, we update the seq_value field in the counters collection and add the updated counter in the students collection as studentId. The mongodb inc operator increments a field by the specified value (1 in our case).MongoDB already has _id which acts as the unique primary key. You can also use your own incremented value as for primary key as well.Let’s insert a few data into our collection to see if the _id field is auto-incrementing correctly. Run the following commands to insert data into the students collection.
db.students.insert({
   "name":"Jhon Doe"
});
db.students.insert({
   "name":"David Smith"
});
db.students.insert({
    "name":"Amanda Herny"
});
The following code will ensure the results are consistent.
db.students.find().pretty();
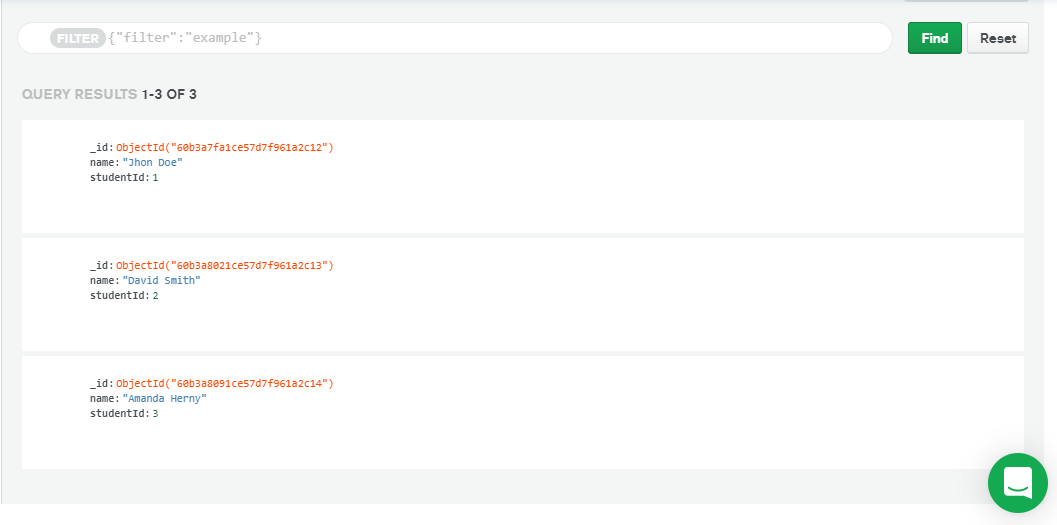
Once the code execution is complete, you will get the following results.
You can also view the results graphically in MongoDB Atlas by traversing to the students collection.To check the document in the counters collection, run the following code.
Notice the value of seq_value field in the counters collection. It has increased to 3 from 0, as we have inserted 3 documents into the students collection.Though auto-incrementing in MongoDB is not recommended or straightforward as in some relational databases, you can still implement an auto-increment field. You need to maintain a different collection and document for tracking the counts.We have covered an approach in the above tutorial. If you want to learn about more approaches, read the blog on Generating globally unique identifiers for MongoDB.
Relevant FAQs
How do I auto-increment a field in MongoDB?
You can implement auto-increment in MongoDB by using a counter collection and a JavaScript function.
How do I auto-increment a column in MongoDB?
MongoDB uses a key-value data storage model. There are no columns in MongoDB
How do I insert value in an auto-incremented field in MongoDB?
You can insert value to the auto-incremented field by using database commands and a JavaScript function. You can learn how to do this using the above tutorial.

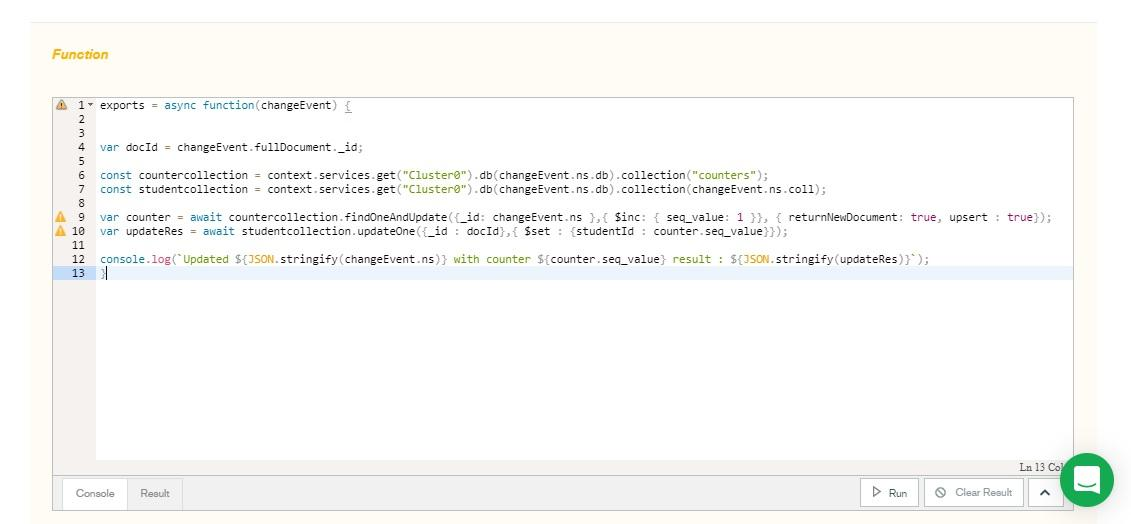 In the code, we have first initialized counters collection and looked for event changes in the students collection. When data is inserted into students, the trigger runs the code. Here, we update the seq_value field in the counters collection and add the updated counter in the students collection as studentId. The mongodb inc operator increments a field by the specified value (1 in our case).
MongoDB already has _id which acts as the unique primary key. You can also use your own incremented value as for primary key as well.
Let’s insert a few data into our collection to see if the _id field is auto-incrementing correctly. Run the following commands to insert data into the students collection.
 To check the document in the counters collection, run the following code.